HTML
Form Elements

Here you will learn some important HTML form elements. These elements are also known as controls in programming language.

Input

<input> is the fundamental form element for gathering user information through forms. This control is used for items that require only one line of user input, such as name, password etc.

AttributeDescription
nameIt specifies the name of the text field
typeIt indicates the type of input control
valueIt refers to the contents of the text field
Default valueIt indicates the default value of the text field
sizeIt allows to specify the width of the text-input control in terms of characters
maxlengthIt specifies the maximum number of characters that can be entered in text field

Example

<!doctype html>  
<html>
    <head> 
       <title>Input Control</title> 
    </head>
    
    <body> 
        <form>
            <input type="text" name="firstname"> 
        </form>
    </body>
</html>

Select

Select field is used to provide predefined list of items to the user. The user can choose one or multiple options from the list depending upon the type of list.

<select> tag is used to create a list and <option> tag creates an item in the list.

AttributeDescription
nameIt specifies the name of the select control
sizeThis can be used to present a scrolling list box
multipleIt specifies that multiple option can be selected at the same time by clicking CTRL key
selectedIt specifies that the current option is selected

Example

<!doctype html>  
<html> 
    <head> 
        <title>Select Control</title> 
    </head>
  
    <body> 
        <form>
            <select name="languages">
                <option value="Maths" selected>Maths</option>
                <option value="Physics">Physics</option>
            </select>
        </form>
   </body>
</html>

Text Area

Text area is similar to text box but it may consist of multiple rows. It is used to get lengthy input from the user like comments and suggestions etc.

<textarea> tag is used to create text area in a form.

AttributeDescription
nameIt specifies the name of the text area
valueIt specifies the contents of the text area
default valueIt specifies the default value of the text area
rowIt specifies the number of rows in the text area
colsIt specifies the number of columns in the text area

Example

<!doctype html>  
<html> 
    <head> 
        <title>Text Area</title> 
    </head>
  
    <body> 
        <form>
            <textarea name="comment" rows="10" cols="30">
                HTML stands for Hyper Text Markup Language. It is used to design web pages using markup language.
            </textarea>
        </form>
    </body>
</html>

Button

<button> is a HTML element which represents a clickable button. It can be used anywhere in a document (so in form) where simple, standard button functionality is needed.

AttributeDescription
submitIt creates a button that automatically submits a form
resetIt automatically resets form controls to their initial values
buttonIt is used to trigger a client-side script when the user clicks that button
imageIt creates a clickable button but we can use an image as background of the button

Example

<!doctype html>  
<html>
    <head> 
        <title>Button</title> 
    </head>
  
    <body> 
        <button type="button">Click Me!</button>
    </body>
</html>

HTML
Form Attributes

Here are some important attributes of <form> tag:

Form Method

Method attribute specifies how the form data is sent to the server. The possible values are:

  • Get: It sends the data as part of URL. The data included with URL can be seen by other people. GET method is default one by browser.
  • Post: It sends the data encoded in HTTP data stream. It is mostly used to send a large amount of data or in sensitive cases. Post method is more secure than GET.

Example

<!doctype html>  
<html>
    <head> 
        <title>Form Method</title> 
    </head>
  
    <body> 
        <form method="get">
          <!--Form Controls-->
        </form>
    </body>
</html>

Form Action

Action attribute specifies where the form data will be submitted. It is normally sent to a script on the server or submitted as email.

Example

<!doctype html>  
<html>
    <head> 
        <title>Form Action</title> 
    </head>
  
    <body> 
        <form method="get">
          <!--Form Controls-->
        </form>
    </body>
</html>

Form Example

<!doctype html>  
<html>
    <head> 
        <title>Form Method</title> 
    </head>
  
    <body> 
        <form action=”form.php” method="get">
               <!--Form Control-->
        </form>
    </body>
</html>


HTML
File Path

A website consists of many files such as text content, code, media, stylesheets and so on. When you’re building a website, you need to assemble these files into a sensible structure on your local machine so you can easily upload them to a server.

A file path specifies the location of a file inside a web folder structure. It’s like an address of a file which helps the web browser to access the files.

File Path Types

File paths are of two types:

Absolute File Paths: It describes the full address (URL) to access an internet file.

<!doctype html>  
<html>

    <head>
        <title>Absolute File Path</title>
    </head>

    <body>
        <a href=”https://phpdocs.com/”>
    </body>

</html>

Relative File Paths: It describes the path of the file relative to the location of the current web page file.

<!doctype html>  
<html>

    <head>
        <title>Relative File Path</title>
    </head>

    <body>
        <img src=”phpdocs-logo.png”>
    </body>

</html>

File Path Accessing

PathDescription
<img src=”picture.jpg”>picture.jpg is located in the same folder as the current page
<img src=”images/picture.jpg”>picture.jpg is located in the images folder in the current folder
<img src=”/images/picture.jpg”>picture.jpg is located in the images folder at the root of the current web
<img src=”../picture.jpg”>picture.jpg is located in the folder one level up from the current folder


HTML
Elements

An HTML element is an individual component of an HTML document or web page. Tags of Hypertext Markup Language tell the browser which elements to present and how to present them on screen.

Basic Elements

The basic elements of an HTML code are:

Heading: denoted using the <h1>, <h2>, <h3>, <h4>, <h5>, <h6> tags.

Paragraph: denoted using the <p> tag.

Horizontal ruler: denoted using the <hr> tag.

Link: denoted using the <a> (anchor) tag.

List: denoted using the <ul> (unordered list), <ol> (ordered list) and <li> (list element) tags.

Image: denoted using the <img> tag

Divider: denoted using the <div> tag

Span: denoted using the <span> tag

Elements Example

Below example will demonstrate the basic architecture of HTML Comments.

<!doctype html>  
<html>
    
    <head>
        <title>HTML Elements Example</title>
    </head>
    
    <body>
        <h1>Introducing HTML Elements</h1>
        <p>Learn HTML Elements with PHPDocs</p>
    </body>
</html>

HTML
Drag & Drop

Drag and Drop (DnD) is powerful User Interface concept which allows the user to click and hold the mouse button down over an element, drag it to another location, and release the mouse button to drop the element there.

It is very useful to copy, reorder and deletion of items with the help of mouse clicks.

Drag & Drop Events

EventDescription
dragstartIt fires when the user starts dragging of the object.
dragenterIt fired when the mouse is first moved over the target element while a drag is occurring. A listener for this event should indicate whether a drop is allowed over this location.
dragoverThis event is fired as the mouse is moved over an element when a drag is occurring. Much of the time, the operation that occurs during a listener will be the same as the dragenter event.
dragleaveThis event is fired when the mouse leaves an element while a drag is occurring. Listeners should remove any highlighting or insertion markers used for drop feedback.
dragIt fires every time the mouse is moved while the object is being dragged.
dropThe drop event is fired on the element where the drop was occurred at the end of the drag operation. A listener would be responsible for retrieving the data being dragged and inserting it at the drop location.
dragendIt fires when the user releases the mouse button while dragging an object.

Drag & Drop Example

Below example will demonstrate the basic architecture of HTML Headings.

<!DOCTYPE HTML>
<html>
    <head>
        <style>
            #div1 {
              width: 350px;
              height: 70px;
              padding: 10px;
              border: 1px solid #aaaaaa;
            }
        </style>

        <script>
            function allowDrop(ev) {
              ev.preventDefault();
            }

            function drag(ev) {
              ev.dataTransfer.setData("text", ev.target.id);
            }

            function drop(ev) {
              ev.preventDefault();
              var data = ev.dataTransfer.getData("text");
              ev.target.appendChild(document.getElementById(data));
            }
        </script>
    </head>
    
    <body>

        <p>Drag the W3Schools image into the rectangle:</p>

        <div id="div1" ondrop="drop(event)" ondragover="allowDrop(event)"></div>
        <br>
        <img id="drag1" src="../images/html/logo.png" draggable="true" ondragstart="drag(event)" width="336" height="69">

    </body>
    </html>


HTML
Divs

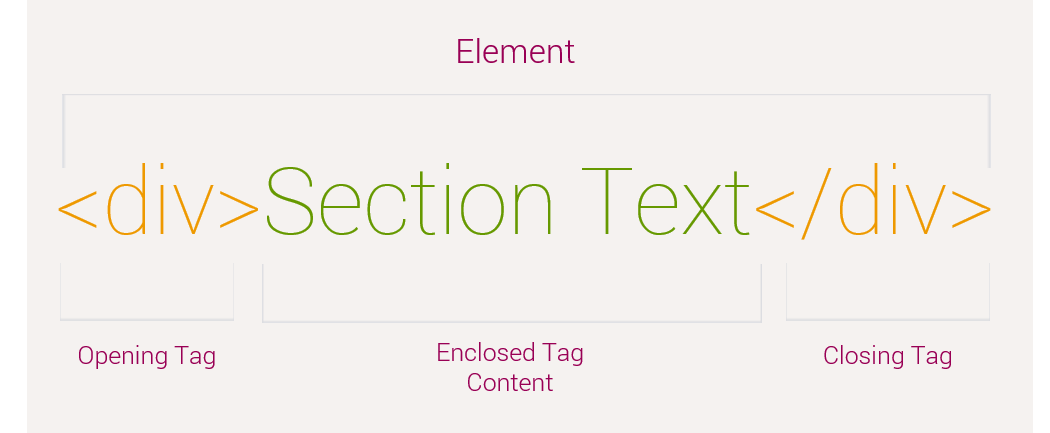
<div> tag is used to define a section in an HTML document. It can be used to group large section of HTML elements together and format them with cascading style sheet.

The closing tag </div> is used to indicate the end of section.

Div Breakdown

Here is the breakdown of HTML Div

Div Example

Below example will demonstrate the basic architecture of HTML Div.

<!doctype html>  
<html>
    <head> 
        <title>Div Example</title> 
    </head>
  
    <body> 
        <div id="testing">
            <h3>PHPDocs</h3>
        </div>  
    </body>
</html>


HTML
CSS

CSS (Cascading Style Sheet) is used to describe how HTML elements are to be displayed on screen, paper, or in other media.

CSS minimizes time and work as it can control the layout of multiple web pages all at once.

Inline CSS

Inline style is applied to an individual tag. It modifies the attributes of a tag in the current occurrence of that tag.

Example

<!doctype html>  
<html>
    <head> 
        <title>Inline CSS</title> 
    </head>
  
    <body> 
        <h2 style="color: red;">PHPDocs</h2>
    </body>
</html>

Internal CSS

An internal style sheet is inserted in the head section of a web page. It only affects the web page in which it is inserted.

Example

<html>
 
    <head> 
        <title>Inline CSS</title> 
        <style type="text/css">
            h2 {color: red;}
        </style>
    </head>
  
    <body> 
        <h2>PHPDocs</h2>
    </body>
</html>

External CSS

An external style sheet is defined in a separate file stored with .css extension. It is very useful when the style is applied too many pages.

To use an external style sheet, add a link to it in the section of the HTML page.

Example

<!doctype html>  
<html> 
   <head> 
      <title>Inline CSS</title> 
      <link rel="stylesheet" href="styles.css">
   </head>
  
   <body> 
      <h2>PHPDocs</h2>
  </body>
</html>


HTML
Comments

Comments are primarily used to explain code or add notes in HTML document which will not display while rendering by the browser. They can be inserted in any section of an HTML document.

Comments Example

Below example will demonstrate the basic architecture of HTML Comments.

<!doctype html>  
<html>
    <head>
        <title>HTML Comment Example</title>
    </head>

    <body>
        <p>Following are comments</p>
        <!--Comment Line-->
    </body>
</html>

HTML
Class

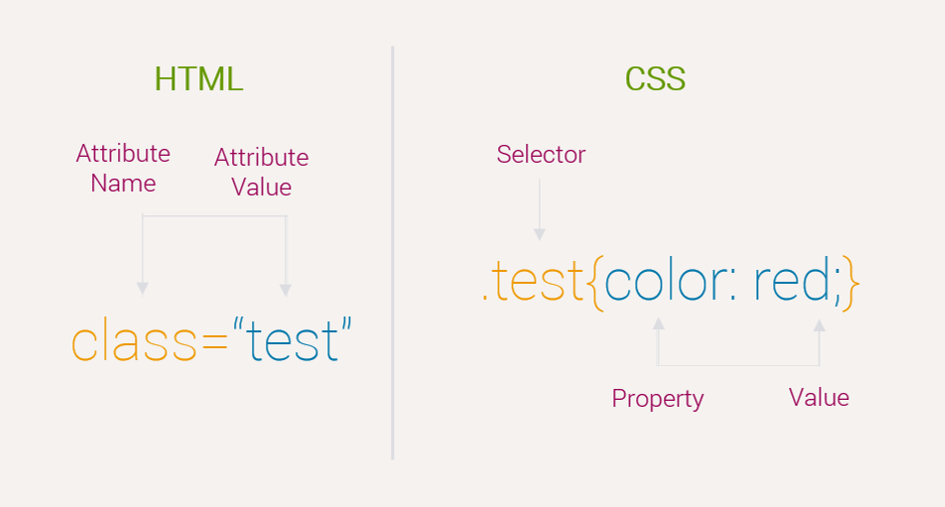
The HTML class is an attribute which is used to specify equal styles for all the elements with the same class name. An ‘class’ selector is a name preceded by a full stop (“.”).

Class Breakdown

Here is the breakdown of HTML Class

Class Example

Below example will demonstrate the basic architecture of HTML Class.

<!doctype html>  
<html>

    <head>
        <title>Class Example</title>
        <style>
            .top {
                background-color: #ccc;
                padding: 20px
            }
        </style>
    </head>

    <body>
        <div class="top">
            <h1>PHPDocs</h1>
        </div>
    </body>
</html>


HTML
Audio

The HTML <audio > tag is used to is used to embed sound files into a web page. It plays by native support for audio playback built into the browser rather than a browser plugin.

Audio Breakdown

Here is the breakdown of HTML Audio.

Audio Attributes

AttributeDescription
srcIt specifies the URL
autoplayIt specifies that the audio will play automatically
controlsIt specifies that the audio controls get displayed
loopIt specifies that the audio will start again every time after finish
mutedIt specifies that the audio should be muted
preloadIt specifies how and when the audio file should load

Audio Example

Below example will demonstrate the basic architecture of HTML Audio.

<!doctype html>  
<html>
    <head>
        <title>HTML Comment Example</title>
    </head>
  
    <body>
        <audio controls>
            <source src="myAudio.mp3" type="audio/mp3">
        </audio>
    </body>
</html>